OAuth Account Linking
OAuth integration allows customers to link their Afterpay account to a merchant’s site, enabling a seamless checkout experience. After the accounts are linked with the oAuth token, customers can skip the Afterpay login flow for future transactions. This reduces friction and increases conversion rates.
Key benefits for merchants:
- Allow customers to link their Afterpay account for faster checkout.
- Streamline your checkout by allowing customers to skip the Afterpay login screen.
- Use OAuth to securely manage customer data and perform actions on their behalf without sharing credentials.
Generate OAuth client credentials
To use the Afterpay OAuth APIs, first you must generate an OAuth Client ID and Client Secret. The Afterpay OAuth server requires the client to authenticate using HTTP basic authentication.
Note
client_id and client_secret are different from merchant_id and merchant_key.
You must generate credentials for each environment and region that you operate in, including both sandbox and production environments. For example, if you are operating in the U.S and Australia, we ask that four sets of credentials be generated. These are two sets for each sandbox region and two sets for each production region.
Generate client ID
A randomly generated identifier, made up of 32 alphanumeric characters ([a-z][0-9]). This can be generated as follows using Linux or macOS:
$ LC_ALL=C tr -dc 'a-z0-9' </dev/urandom | head -c 32; echo
Generate secret
A password, encoded using the BCrypt algorithm (version: 2a, strength: 10). The Linux/macOS htpasswd tool can be used to encode the password. For example:
$ htpasswd -bnBC 10 "" "plain password here" | tr -d ':' | sed 's/$2y/$2a/'
Once complete, check that the client secret starts with $2a$.
Note
Use the plain text version of this password in the authentication header of requests to Afterpay.
Collect redirect URLs
All possible URLs that you may provide when creating a checkout using v2/checkouts need to be provided, as they must be allowlisted. The URLs should exclude any query parameters and should be provided for each environment and region you operate in.
Send credentials to Afterpay
Your solution delivery manager will provide you with a secure way of sending these details to Afterpay.
In basic authentication, a request contains a header field in the form of Authorization: Basic, where credentials is the Base64 encoding of client_id and client_secret joined by a single colon.
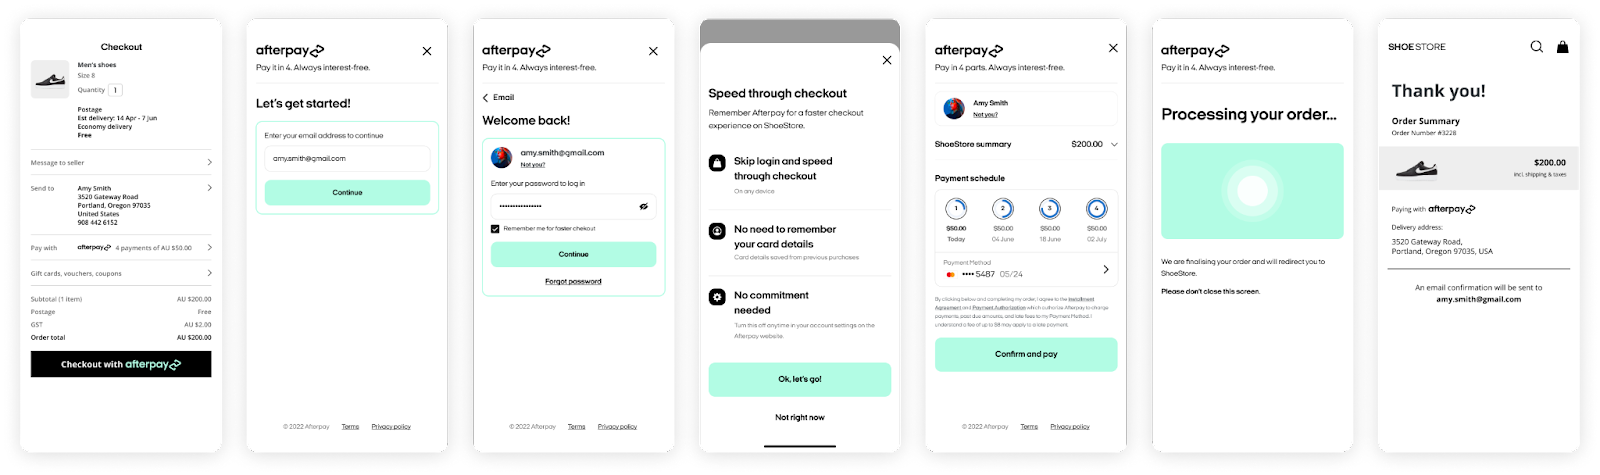
Link a customer’s Afterpay account
When a customer is prompted to link their Afterpay account, they’re shown an authorization request screen. The screen asks for their consent to link their Afterpay account to the merchant’s website. The customer can accept or decline the request.
If they accept, the redirectConfirmUrl contains an authorization code. As a merchant, you can use this authorization code to fetch a refresh token, which you’ll securely store in your database. You can use this refresh token for future transactions. No persistent link is established on Afterpay’s side; the connection is maintained solely by a merchant using the refresh token.
OAuth Scopes
These OAuth scopes are required to perform the account link:
read_user_info: Permits access to the/oauth/v1/userinfoendpointcreate_checkout: Allows the grant holder to create a checkout on behalf of the customer
Implementation
-
Create an Afterpay checkout using the v2/checkouts API - Create Checkout
-
Initiate an Afterpay checkout using the URL from the checkout creation response. Use the checkout token created by the v2/checkouts API, and your Client ID
https://portal.afterpay.com/au/checkout/?token=002.xxx&state=obtaining_code&response_type=code&client_id=123456&scope=create_checkout%20read_user_info&https://merchantwebsite.com/response_type: Set tocode, indicating that you expect to receive an authorization code if successful.token: The checkout token created using thev2/checkoutsAPIclient_id: Your OAuth client IDscope: The scope values you are requesting, comma separated. See the OAuth Scopes sectionredirect_url: The URI that customers will be directed to after checkout. It must match one of the URIs you gave to Afterpay when generating your OAuth credentials.
-
After the customer completes the checkout, they are redirected to the merchant
redirectConfirmUrlwith the additional authorization code.https://merchantwebsite.com/checkout?status=SUCCESS&orderToken=002.xx&code=xxxxx -
When an authorization code is returned, the Merchant can exchange the code for an access token and a refresh token using the Afterpay OAuth API.
-
Store the
refresh_tokenagainst the customer account on your system for future use. Theaccess_tokenexpires after five minutes; during the initial link, it’s returned to you as a convenience in case you want to immediately launch a new checkout.
Example authorization code grant request
Note
Because this is an application/x-www-form-url encoded request, the parameters for grant_type and refresh_token should be encoded into the request body, not as URL parameters.
Example response (successful)
Note
To prevent a replay attack, the authorization code can only be used once. Subsequent requests using the same code will be rejected.
The authorization code has a lifetime of 10 minutes, after which time it expires and is no longer valid.
Example response (error)
Errors
If the customer denies the authorization request but confirms their order, they’re redirected to your redirectConfirmUrl with a checkout status of SUCCESS. The error parameter is added to the redirect URL.
Example:
Location: https://merchant.com/checkout?status=SUCCESS&orderToken=xxxx &error=xxx&state=xxx
If the authorization request fails due to errors such as access_denied, unauthorized_client, or invalid_scope, the customer will complete the checkout process and be redirected with the error parameter in the URL.
Note
The error parameter and the status parameter are independent variables. The presence of an error parameter doesn’t mean that the checkout is cancelled.
If the client_id is missing or invalid, no error is returned. The customer will complete the checkout flow and be redirected with a checkout status of SUCCESS or CANCELLED.
Launch an authenticated checkout
Once the customer has linked their Afterpay account, they can skip the login process during future transactions on the merchant’s site. The customer will be directed straight to the Afterpay payment summary page after initiating checkout, without needing to enter login credentials again.

Retrieve a new access_token
First, use the refresh_token stored against the customer’s account to retrieve a new access_token.
Example request
Example response (successful)
The response to the refresh token grant is the same as when issuing an access token, except that it doesn’t include the refresh token. The original refresh token will continue to be valid.
Example response (error)
The response to the refresh token grant is the same as when issuing an access token except that it doesn’t include the refresh token. The original refresh token will continue to be valid.
Example response (refresh token invalid or revoked)
The response to the refresh token grant is the same as when issuing an access token except that it doesn’t include the refresh token. The original refresh token will continue to be valid.
Create checkout
Create the checkout using the access_token as the Bearer value in the Authorization header.
The customer should now be directed to the Afterpay summary screen instead of being prompted to log in.
Instructions for payment service providers
If you are a payment platform that manages the checkout experience on behalf of merchants, use the Create Checkout request below to ensure that the checkout gets correctly attributed to the end merchant.
This example shows a create checkout request with the access token in the payload, along with an additional header (x-apt-on-behalf-of) containing the base64 encoded credentials of the merchant to whom the checkout should be attributed. In this scenario, the client does not need to be configured with default association to an Afterpay Merchant.
Example request
Encoding credentials:
echo -n "clientID:clientSecret" | base64
Note
The clientSecret here should be your plaintext password, not the BCrypt encoded password provided to Afterpay when onboarding.
Retrieve customer information
To retrieve a customer’s linked account information, make a GET request to the userinfo endpoint and pass the access token.
Example request
Example response
Unlink a customer’s account
There are three ways that a customer’s account can be unlinked:
- The customer can unlink merchant accounts via their Afterpay profile settings
- Afterpay can revoke the token if we determine that the client has been compromised
- If a merchant wants to unlink a customer account, they can send a POST request to
/oauth/revokewith Client Authentication and the refresh token to revoke.
Once the customer account is unlinked, the refresh token is removed from the Afterpay system.
Example request
Testing Environments
OAuth Endpoints
Checkout Endpoints
OAuth does not currently support the Global API.