Adding the Express Checkout Button

You must show an Afterpay, Clearpay (UK) or Cash App Afterpay (US) checkout button on your cart and/or product pages to enable Express Checkout. When clicked, the checkout button starts the checkout process in a popup flow.

Options for the Express Checkout Buttons

There is a selection of buttons available for each stage of the checkout. Each button clearly shows the customer what the following action is. Examples of these buttons are:

Product Page/Shopping Cart

image9-small.png
image3-small.png

Order Placement

image17-small.png
image15-small.png

Product Page/Shopping Cart - US Only

product-page-shopping-cart-button-small.png
Button Type - Green - Checkout with -small.png

Order Placement - US Only

order-placement-button-small.png
button-type-continue-with-small.png

Product Page/Shopping Cart - UK Only

clearpay-checkout-green-small.png
clearpay-checkout-black-small.png

Order Placement - UK Only

clearpay-place-order-green-small.png
clearpay-place-order-black-small.png

Changing the Appearance

AttributeValuePreview
textBuy-now
textPay-now

Examples

1<afterpay-button text="buy-now" merchantpublickey="..." ></afterpay-button>
1<afterpay-button text="pay-now" merchantpublickey="..." ></afterpay-button>

Default values

When the text attribute is not provided, the button displays the “Buy now with Afterpay” option, or in the US, “Buy now with Cash App Afterpay.”

1. Import the JavaScript

Import the AfterpayButton.js script as a script tag.

1<script
2src="https://static-us.afterpay.com/javascript/button/afterpay-button.js"
3type="text/javascript"></script>

2. Add the Afterpay Button Element

Insert the following HTML to initialize the afterpay-button element.
You will need your merchant public key, which is provided by Afterpay. Your public key is used solely to identify your account with Afterpay. They aren’t secret. In other words, they can safely be published in places like your JavaScript code, or in an Android or iPhone app.

1<afterpay-button
2merchantPublicKey="d2da7000bb4811eb85290242ac130003"></afterpay-button>

3. Configure the Afterpay Button Element for Express Checkout

Afterpay can be launched from different entry points (product-page, mini-cart, cart) in the customer journey. To enable the express checkout flow, set the following attributes:

1<afterpay-button
2 type="express" // determines checkout type
3 afterpayEntryPoint="cart" // options include "product-page", "mini-cart", and "cart"
4 afterpayCheckoutButtonLabel="Express Checkout"
5merchantPublicKey="d2da7000bb4811eb85290242ac130003"
6 >
7 Express Checkout
8</afterpay-button>

3. Set Order Attributes

Before a customer can checkout with Afterpay, we need to know, at a minimum:

  • Merchant Reference - The merchant’s unique order id/reference that this payment corresponds to. This is used to reconcile orders in the Afterpay merchant portal.
  • Amount - The total amount of the order to be charged to the customer. This includes any shipping and tax, minus any discounts. This is the maximum amount that you can charge to the virtual Visa Card.
  • Currency - The currency in ISO 4217 format. The value provided must correspond to the currency of the Merchant account making the request.
  • Consumer details - The customer’s phone number, name, and email address
  • Shipping details - The shipping name and shipping address
  • Items - This contains information about the line items in the order.
1const afterpayButton = document.getElementsByTagName('afterpay-button')[0];
2afterpayButton.addEventListener('click',
3 function (e) {
4 afterpayButton.merchantReference= "";
5 //Money Object
6 afterpayButton.amount= "";
7 afterpayButton.currency= "";
8 //Item Object
9 afterpayButton.items= JSON.stringify(lineItems);
10 //Consumer Object
11 afterpayButton.consumerPhoneNumber= "";
12 afterpayButton.consumerGivenNames= "";
13 afterpayButton.consumerSurname= "";
14 afterpayButton.consumerEmail= "";
15 //Contact Object
16 afterpayButton.shippingName= "";
17 afterpayButton.shippingLine1= "";
18 afterpayButton.shippingLine2= "";
19 afterpayButton.shippingArea1= "";
20 afterpayButton.shippingArea2= "";
21 afterpayButton.shippingRegion= "";
22 afterpayButton.shippingPostcode= "";
23 afterpayButton.shippingCountryCode= "";
24 afterpayButton.shippingPhoneNumber= "";
25 // In-Store Pickup
26 afterpayButton.instorePickup = false;
27
28 //Contact Object
29 afterpayButton.billingName= "";
30 afterpayButton.billingLine1= "";
31 afterpayButton.billingLine2= "";
32 afterpayButton.billingArea1= "";
33 afterpayButton.billingArea2= "";
34 afterpayButton.billingRegion= "";
35 afterpayButton.billingPostcode= "";
36 afterpayButton.billingCountryCode= "";
37 afterpayButton.billingphoneNumber = "";
38
39 // Buy Now Flag (Changes the button text displayed in the Afterpay Checkout)
40 afterpayButton.buyNow = true;
41 }, true
42);
Buy Now Flag

This shows the customer a “Buy Now” button at the end of the Afterpay checkout flow

View Example

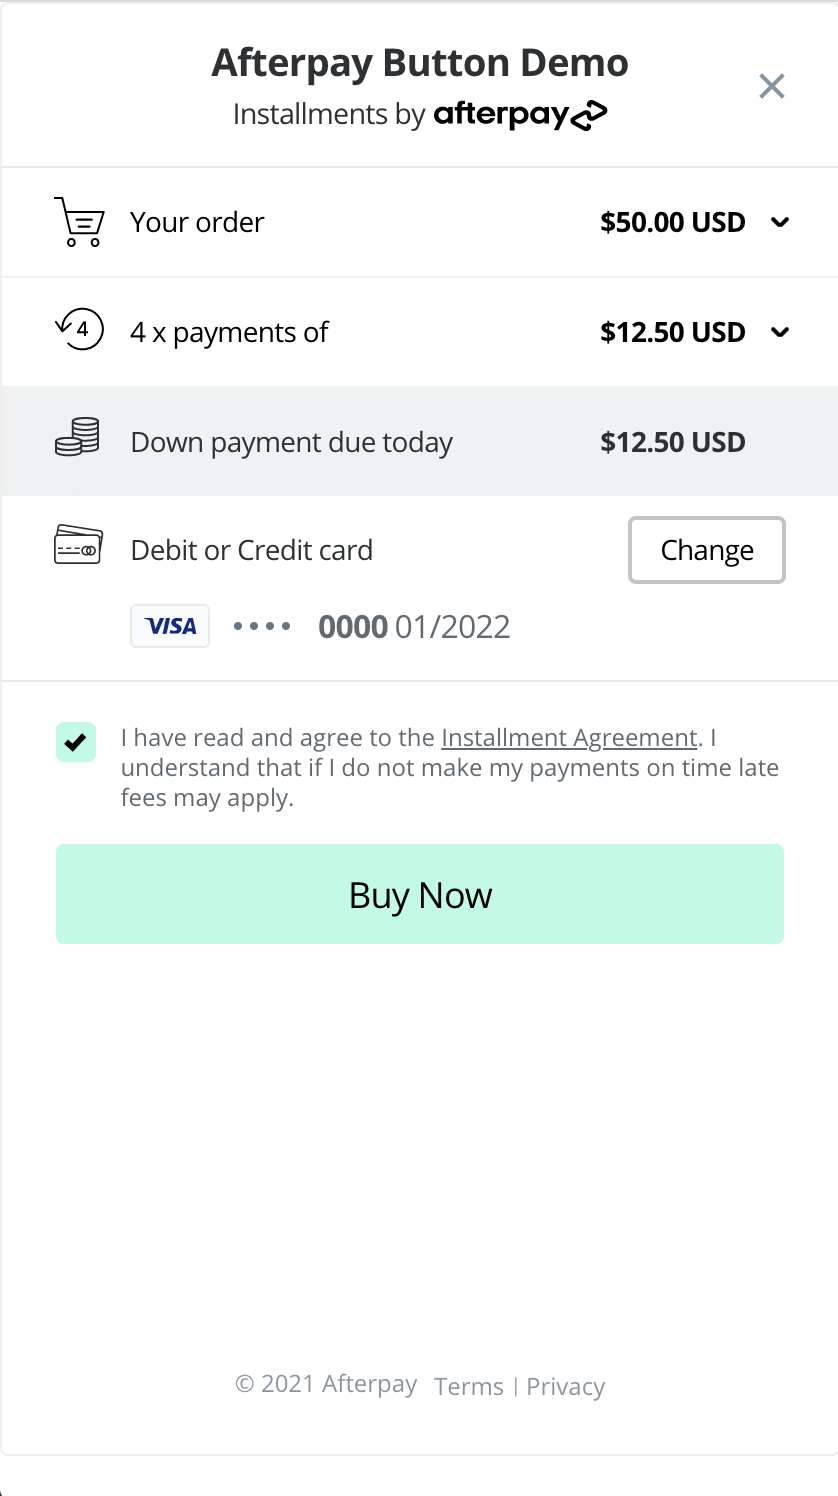
When this flag is not set the button displays “Confirm”

Increase Conversion Rates

Providing customer details allows new customers to speed through checkout with prepopulated name and address fields.

Object Types

In-Store Pickup

If the customer has chosen to pick up the order in a store, no shipping address is required, instead, set instorePickup to true.

Money object

AttributeTypeDescription
amountstring requiredThe amount is a string representation of a decimal number rounded to 2 decimal places.
currencystring requiredThe currency in ISO 4217 format. Supported values include “AUD”, “USD”, and “CAD”. However, the value provided must correspond to the currency of the Merchant account making the request.

Item object

This contains information about a line item in the order. The value given to the afterpayButton.items is a string. To pass line item details an array of item objects should be provided using JSON.stringify.
afterpayButton.items= JSON.stringify(itemsArray);

Example Item Object
1{
2 "name": "Blue Carabiner",
3 "sku": "12341234",
4 "quantity": 1,
5 "pageUrl": "https://merchant.example.com/carabiner-354193.html",
6 "imageUrl": "https://merchant.example.com/carabiner-7378-391453-1.jpg",
7 "price": {
8 "amount": "40.00",
9 "currency": "USD"
10 },
11 "categories": [
12 ["Sporting Goods", "Climbing Equipment", "Climbing", "Climbing Carabiners"],
13 ["Sale", "Climbing"]
14 ],
15 "estimatedShipmentDate": "2021-03-01"
16}
AttributeTypeDescription
namestring requiredProduct name. Limited to 255 characters.
skustringProduct SKU. Limited to 128 characters.
quantityinteger requiredThe quantity of the item, stored as a signed 32-bit integer.
pageUrlstringThe canonical URL for the item’s Product Detail Page. Limited to 2048 characters.
imageUrlstringA URL for a web-optimised photo of the item, suitable for use directly as the src attribute of an img tag. Limited to 2048 characters.
priceMoney  requiredThe unit price of the individual item. Must be a positive value.
categories[][]An array of arrays to accommodate multiple categories that apply to the item. Each array represents a hierarchical path to a category, with the left-most category being the top-level parent category.
estimatedShipmentDatestringThe estimated date when the order is shipped, in YYYY-MM or YYYY-MM-DD format.

Consumer object

AttributeTypeDescription
phoneNumberstringThe customer’s phone number. Limited to 32 characters.
givenNamesstringThe customer’s first name and any middle names. Limited to 128 characters.
surnamestringThe customer’s last name. Limited to 128 characters.
emailstring requiredThe customer’s email address. Limited to 128 characters.

Contact Object

AttributeTypeDescription
namestring requiredFull name of contact. Limited to 255 characters
line1string requiredFirst line of the address. Limited to 128 characters
line2stringSecond line of the address. Limited to 128 characters.
area1stringUS: City CA: City Limited to 128 characters
area2stringUK: village or local area Limited to 128 characters
regionstringUS: State CA: Province or Territory Limited to 128 characters
postcodestringZIP or postal code. Limited to 128 characters.
countryCodestring requiredThe ISO 3166-1 country code. Limited to 2 characters
phoneNumberstringThe phone number, in E.123 format. Limited to 32 characters.

5. Set express checkout attributes

Within the listener event, attach an expressCheckout object attribute with the following configurations:

  • Set region to the two-character ISO 3166-1 country code of the Merchant account

  • Set the flag shippingOptionRequired to:

    • false: if shipping options are not required to be displayed in the Express Checkout flow
    • true: if you intend to provide shipping options to to the customer within the Express Checkout flow (i.e. Integrated Shipping). This is the default value
  • Handle lifecycle events:

    • onComplete: see The onComplete Callback section below for more details
Example with Deferred Shipping
1const afterpayButton = document.getElementsByTagName('afterpay-button')[0];
2afterpayButton.addEventListener('click',
3 function (e) {
4 // ...all attributes listed in step 4 above,
5 afterpayButton.expressCheckout = {
6 region: 'US',
7 onComplete: function (data) {
8 /* handle success/failure of checkout */
9 },
10 shippingOptionRequired: false
11 }
12
13 }, true
14);
Note

The information on this page also applies to Cash App Afterpay (US) and Clearpay (UK).